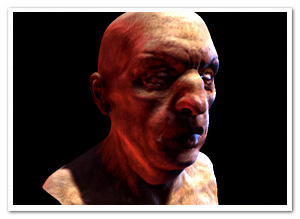
 It’s been a while since I’ve made a blog post about something I’ve played around with just for the heck of it. With Away3D 4.1 Alpha pushed out yesterday, I decided to spend the day revisiting an old friend: skin rendering. Remember the blog post of skin rendering when Away3D 4 was still codenamed Broomstick over a year and a half ago? (ugh, time flies!) A lot has changed in the engine, and many new features have been added. It made sense to therefore build a new but similar example showing some newer additions, and highlighting how things were put together. There’s two variations of the demo:
- With a familiar face: Using the same Lee Perry-Smith model as before, for direct comparison (and because it’s free and I’m a stingy wretch)
- With a unfamiliar face: Using a free (and insanely detailed) model from TurboSquid because I’m getting a bit sick of the old head (no offence intended to Mr. Perry-Smith) And again, it’s free and I’m a stingy wretch!
As usual, click+drag to move the camera.
There’s source right here. There’s a bunch of boiler plate in there, but the only thing of interest in this case should be the initMaterial method in Main.as. I’ll highlight the material setup here.
Multi-pass materials
The demo is using a multi-pass material for a few reasons. It allows the shadow mapping to more complex, and it prevents the non-casting lights from being masked by the shadow map, allowing for more dramatic lighting effects.
Soft Shadows
With a SoftShadowMapMethod assigned to the material, it’s possible to – as the name suggests – cast soft shadows on the skin. The class was updated in Away3D 4.1 along with some other shadow map methods, allowing more samples to be taken in the shadow map. This way, the results are much smoother which is especially important when tweaking the method’s range property. It sets the distance with which shadow map samples are taken, effectively creating softer shadows (a setting you can tweak in the demos). Of course, the more samples you take, the more demanding your shader will become.
Fresnel Specular Highlights
This is identical to the old demo. It uses FresnelSpecularMethod to achieve the fresnel effect, causing stronger highlights at glancing viewing angles. The fresnelPower can be tweaked to change the viewing angle fall-off: higher values increase the fresnel effect.
Subsurface Scattering Through Gradient Diffuse Lighting
By using GradientDiffuseMethod, you can acchieve a very crude approximation to subsurface scattering. It allows you to pass a gradient image to define the colour and strength of the diffuse reflection for each light/normal-angle. The left of the texture (x = 0) contains the reflection for surfaces pointing away from the light, the right is the reflection when completely facing the light. This allows darker lighting to be made a bit lighter. In this case, by introducing a little red in the mid-values (see “embeds/diffuseGradient.jpg”), we can simulate the addition of scattered light into the final shaded colour. While it doesn’t create true translucency effects similar to SubsurfaceScatteringDiffuseMethod, it does create an organic softness when viewing the surface head-on, an effect that is as subtle as it is effective.
Lighting Set-up
The light set-up is very traditional, a directional light coming from above and the front (by default) with a bright blue point light to the right and a red point light to the left. It’s worth noting however that I’ve set the directional light’s specular property to a much lower value to prevent it from creating strong highlights. Much like a softbox, I’d imagine.
Enjoy tweaking!


wooow better then web glide everyone complains about plugins but plugins are usefull this rendering prove that! good job
Pingback: Skin Rendering with Away3D 4.1 and Stage3D |
Very nice David. Next one is going to be so realistic that you are going to make me vomit.
Where can I get GradientDiffuseMethod.as?
sorry for the stupid question, I used a different version
can you implement Though Jimenez SSS algorithm ? Is it eavn possible?
http://www.iryoku.com/separable-sss-released
Radu: Separable SSS would probably be technically possible with limitations, but for Stage3D it probably wouldn’t be a very optimal implementation due to high instruction and sample counts. I would love to experiment with it, but sadly there’s only 24 hours in a day :)