 Molehill, Adobe’s new API to leverage the GPU for rendering, was made public some time ago in the form of an “incubator” Flash Player release, and along with it we released an early pre-alpha version of Away3D 4.0, codenamed “Broomstick”. I’ve been working on the new engine for quite some time now, and since the release I hadn’t had the time to post any more information aside from what was shown on the blog post. Time to change that, I’d say!
Before you do anything else, you’ll need to install the Incubator Flash Player, because the demos will be using that. Secondly, there’s no guarantee that anything related to Away3D 4.0 will be exactly the same in the final release, as it is of course an early alpha. Finally, source for all demos is in the usual Away3D repository. They’re a bit messy, since they were actually just quick test files to see if everything still works ;)
Subsurface scattering
Subsurface scattering is basically what happens to light when it travels through a translucent surface. Instead of either simply reflecting off a surface or passing through it, the light will enter the material, reflect a good couple of times before exiting the surface again and reaching the eye. This behaviour causes a general blurring of the diffuse lighting on an object and allows light to shimmer through less “thick” regions. Just think about how a candle’s flame shines through the wax.
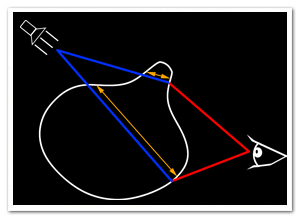
There’s a few rendering techniques that perform subsurface scattering to some extent. A popular approach is to render the diffuse lighting to a texture and simply blur it  slightly. However, I find that this approach doesn’t allow light to travel through an object and so I opted for another approach: using depth maps. Similar to shadow mapping, a depth map is rendered from the point of view of the light, and when rendering, we compare depths of the rendered pixel to the value in the depth map. Instead of using this to determine whether a pixel is in shadow or not, we can use the difference between these values to determine the “thickness” of the object, or how far light has to travel through it to be able to reach the eye (see my amateurish schematic on the right :) ).
Depending on this distance, we can colour the pixel differently. We define a colour the light gets by traveling through the object (this depends on the actual material), and the final pixel’s colour ranges from this “scatter colour” to the material’s (texture) colour, depending on how thick it is.
This technique can be used to make materials look like wax, such as in this demo.
Advanced Skin Rendering
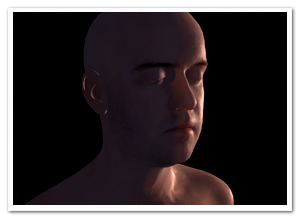
Skin is in fact a translucent object, so we can use subsurface scattering to increase the realism, as usual rendering techniques often create a harsh or clay-like effect. Instead, subsurface scattering softens the general shading and allows light to travel through more translucent regions such as the ears, softer parts of the nose, etc.
To further increase the realism, the specular highlights are modulated using a fresnel term. As with most objects in reality, the reflectivity of an object changes depending on the view angle, and with it the strength of the highlights. When observing skin head-on, there’s usually not a strong direct light reflection, but it can usually be perceived on shallow angles.
The result of both can be seen here.
In Away3D 4.0
First of all, to get started using Broomstick, check out this article by John Lindquist. He did a great job explaining how to get started!
Default materials in Away3D 4.0 are currently implemented using “methods”, which are properties of a material that define how the shaders work in a modular fashion. This way, there’s no need for a billion variation of Material classes for each combination. For subsurface scattering, we need to change the diffuseMethod property of a material and assign an instance of SubsurfaceScatteringDiffuseMethod. For the fresnel specular highlights, we assign an instance of FresnelSpecularMethod to the specularMethod property. It’s all in the source, so knowing this, you should be able to make sense of what’s going on in there :)
Demos
In case you skipped through the rest of the article, here’s a demo recap. Loading times may be long, as the models are pretty big :)
Wax Statue : Illustrating subsurface scattering to generate a material resembling wax.
Head rendering: Using subsurface scattering and a specular fresnel term to increase realism in skin rendering. Press any key to toggle the subsurface scattering, so you can see the difference. Note the light shining through the ears, for example.


Dr. Lenaerts… amazing as usual! Thx for the explanations.
Hi there, just to let you know that the above examples no longer work with the current FP11RC1..
Pingback: Another Take on Skin Rendering | Der Schmale - David Lenaerts's blog
Pingback: Deferred Subsurface Scattering using Compute Shaders | Der Schmale - David Lenaerts's blog