 Exciting times afoot! In the not too distance future, we’ll finally get what we’ve been nagging about! I’m of course talking about Molehill, the new hardware-accelerated API Adobe is working on. If you’re curious what we’re doing with Away3D, take a peak at the demo we did with the guys from Evoflash for Adobe MAX. Old news, I know. Moving on.
All that and more is still some time in the future, and in the meanwhile we need to make do with what we currently have available. As part of a session at AUG XL and FlashPlatform, I gave some examples of what we currently can do with Away3D Lite if we’re willing to get our hands a bit dirty. As examples I explained some effects I did for the Spiral Out demo. Now, it’s time to clean up the code mess and explain a thing or two to a slightly broader audience :)
Basically, what I’ll do is show some things that involve making assumptions that prevent the code from being scalable (ahhh… you got me… that’s just a nice way of saying I’m cheating!). The first step isn’t actually cheating at all, and it’s an old and pretty standard shading technique. However, we’ll need this for part 2 in which we’ll do nothing but cheating, and since no one ever seems to do shaders in Lite I thought it’d be a good way to get started.
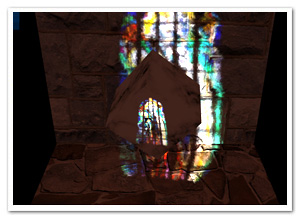
This it what we’ll end up with. Not the most attractive demo, but it’ll do. Lengthy explanations ahead, for which the source can come in handy (under examples/projectionMapping) :)
Projective Texture Mapping
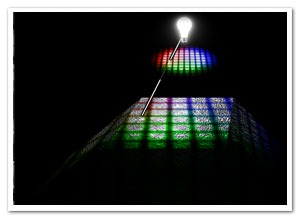
 Projective texture mapping, as the name clearly suggests, is a texture mapping technique that mimics a light projecting a texture on objects in the scene (think of a projector slide, a lamp shade’s projections on the walls, …). As I said, there’s nothing new or special about this; it’s been done countless times before. The picture on the right pretty much shows all there’s to it (click to enlarge).
Essentially, we place the “light texture” in front of the light. All we need to do, is draw a line from the position we’re currently shading (the “target point”) to the light (the “source point”) and figure out where that line intersects the plane. Grab the light texture’s colour at that position and multiply it with the object’s base texture colour to get the final shaded colour. We can also incorporate additional shading calculations, particularly normal mapping.
Exactly how we calculate the intersection is up to you. You can do a line-plane intersection calculation, or you can – surprise surprise – use a perspective projection matrix to project the target point onto the texture. So rather than projecting the texture onto the object, we’re effectively projecting the object on the texture first. The latter approach is much more flexible and intuitive, since it’s exactly how a camera projection works (in part 2, we’ll see that this will come in handy too).
Shading in Away3DLite
Away3DLite, minimal as it is, has only very limited support for shading. There’s a Dot3BitmapMaterial that no one seems to know about, though, courtesy of Mr. Bateman ;) I recommend taking a look at that code, just to see how you could implement a custom shader. At a minimum, all you’d need to do is extend BitmapMaterial and override the updateMaterial method (don’t forget to include and use the namespace arcane). In there, you can do anything you like as long as you end up passing a valid BitmapData object to the _graphicsBitmapFill.bitmapData property. For shading purposes, it’s best to keep a second BitmapData object to which we’ll be rendering the shaded version of the texture, leaving the original _bitmap object intact for subsequent frames. Of course, for any advanced shading on BitmapData objects, Pixel Bender is king, so we can run a ShaderJob in there.
Taking a look at the source for the ProjectiveTextureMaterial, that’s pretty much exactly what is happening, with one difference. We’re exposing a manual update method rather than overriding updateMaterial. This seems rather odd (and in this particular case it is) but we’ll need that next time (remember, we’re hacking anyway) ;)
There’s of course a final caveat, in that we don’t have any position information since we just have a bunch of BitmapData objects, no actual geometry. And that is of course something essential if we want to do any projecting at all. For that we can take the same approach as the Away3D Pixel Bender shaders do: position maps. Whereas a normal map encodes the normal for every texel, a position map encodes the object position at that point. In Away3D, the pixel shaders generate a position map automatically from the geometry when a material is created, but in Lite, we’ll settle for creating them manually. This actually makes it possible to add details from a height map, providing the shader with much more detailed topological information than what would have been generated from a bunch of triangles. As a result, the projected map can be subtly displaced as it would on a real uneven surface. It’s not very hard to create position maps procedurally (which is part 3) if you keep in mind that xyz maps to rgb and 0x00-0xff for each colour channel maps to the minimum and maximum bounds of the respective coordinate (so where x == minX, r would be 0).
Demo and source
To see the effect in action, check out the demo. Move the mouse to move the projector, click and drag to move the camera, and use the mouse wheel to move the projector closer or farther from the scene. There’s also a small projection avatar floating around that shows to position and orientation of the projector.
Source can be found in my repo at Google Code.
A long post, which I hope is useful for people. If not, let me know and I’ll keep it more concise next time! :)
And oh yes, happy New Year’s!


Amazing! But still a bit cpu intensive IMHO for any machine over a couple years old to be really practical.
You’re on away team, so why not committing it directly there?
Nice! Agree with @makc about contributing directly into the Away 3D engine.
@eco_bach Texture Mapping and other cool 3D effects will be practical and usable with a “molehill”.
makc/focus: Personally, I don’t think any sort of hackish or non-scalable code belongs in a library, especially not one that is labeled “Lite”. It kind of beats the purpose ;-)
eco_bach: CPU can be reduced easily by simply reducing the texture sizes. I haven’t mentioned it explicitly in the post, but it’s also meant as more of a start to motivate hacking shaders, and especially to try and get people acquainted with basic shader programming. With GPU support coming up, I think that will be a very important aspect of developing good looking games (more important than just throwing an insane amount of triangles at the renderer).
I was trying to get this to compile in Flash CS5, and I’ve hit a wall with this error:
On line 140 of ProjectiveTextureMaterial.as:
new ShaderJob(_shader, _renderBitmap).start(true);
I get Error #2004: One of the parameters is invalid.
Not sure what’s invalid, I’m struggling with this as I’m pretty new to Actionscript & Flash.
Pingback: Hacking the Lite pt.2: Fake Shadow Mapping | Der Schmale - David Lenaerts's blog