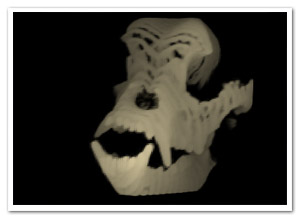
After a futile exploration of sparse voxel octree ray casting using Alchemy (which was fun but hopeless), I turned towards another technique for volume rendering, using view-aligned slices. The approach is not much different from the rendering of this older experiment, in which the slices were aligned to the object itself. Again, we’re using the same technique to create and read from the 3D texture (which is static in this case): ie. a set of cross sections placed next to eachother. CT scans are wonderful for this:

Not that the image above is just a crop-out, we need a lot more to make it look decent (I used 32 cross sections).
Rendering the slices
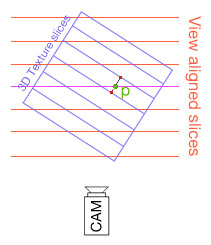
 When using view-aligned slices, they typically won’t be aligned to the texture’s slices, as illustrated in the image to the right (yes, my graphic skills are EPIC!). The point p is any point on any view-aligned slice. We need to know where it is in the texture’s 3D space. This is simply a change of basis transformation, where both bases are defined to have the same origin. In our specific case, eye space is world space, so all we have to do is multiply p with the inverse of the object’s delta transformation matrix. Since the result will usually lie between 2 slices of the 3D texture (as in the illustration), we sample both texture slices with constant x and y coordinates and interpolate the colour values. This approach is not 100% correct, since the interpolation should also be aligned to the view. However, for this purpose, it’s a good trade-off for some extra performance.
As this needs to be done for every pixel on every slice, we’re doing these calculations through Pixel Bender. And that’s how it works in general lines. There’s some translations and scaling going on as well to ensure a uniform and properly centered transformation. If you’re still interested, you can check the source for that. Important to note is that half the slices in the back are actually culled for a worthwhile performance boost. They don’t really contribute all that much to the final image after all.
Demos
Click and drag to rotate the pitbull skull in all demos:
- High quality: using a 4096×128 (ie 128x128x32) texture with 16 visible slices
- Low quality: using a 2048×64 texture with 16 visible slices
- Ultra quality: using a 4096×128 with 50 visible slices (slow!)
- Ultra high quality static rendering with low quality dynamic rendering: getting the best of two worlds
- Source


Very impressive!
Wow, can’t wait to try it out!
hi,
indeed a nice one. reminds me of the marching cubes render a bit less precise (no isosurface is actually built up) but visually convincing and soooo much faster.
congrats and thanks for the code a :) (lots to learn from it )
kinda reminds mrdoob voxel head except that it renders far more useles pixels :))
Nico: Yeah, if you want good precision you’d need a pretty high image resolution (and number of slices). It can look really cool, but I’m afraid your cpu won’t like it either :-)
Makc: Mr. Doob/Roman Cortes’ voxel head was insane! :) Important to note, tho, is a fundamental difference in the two approaches. The voxel head is strictly speaking using a surface rendering method. For volume rendering, you need to deal with a lot more data. To show the difference: https://www.derschmale.com/lab/humanhead/ – I used a similar ct-scan of a human head (128x128x53). The skull is rendered through the skin (as it shows up as translucent in the scan). This method allows you to look at cross-sections of the object easily (toggle visibility per slice in the source code). Also, I hacked the current version to loose perspective so I can draw everything easily on one BitmapData. If only PB in FP10 wasn’t so dreadfully slow on conditionals, you could do some easy alpha-testing to check when calculations are still necessary.
You could fake surface rendering by changing the image to be either completely white or black per pixel, but due to the alpha check performance issue, PB wouldn’t be the best option for that.
That is ridiculously great!! I wonder how much of a speed increase PixelBender is actually enabling…
Pingback: Slice-based volume rendering using Pixel Bender | Adobe Tutorials
I am also interested in medical data visualisation through Flash.
You can have a look at an example to see Dicom using also manipulation techniques at pixel level (but it has been done in Flash 9). Here you can find the example:
http://dicom.netpatia.com/dicom/